


Have you ever taken what seemed like the perfect photo, only to discover it looks blurry when you zoom in? You’re not alone. Camera shake is one of the most common reasons photos lose sharpness, especially when shooting in low light or using longer lenses.
If you’re searching for how to fix shaky hands photography, the good news is that you don’t need steady surgeon-like hands to capture sharp images. With the right techniques, camera settings, and equipment, you can dramatically reduce blur and improve your results.
In this guide, you’ll learn what causes camera shake, how to stabilize your shots, which camera settings matter most, and practical solutions for photographers of every skill level.
Understanding Why Shaky Hands Affect Photography
Before fixing the problem, it helps to understand what’s happening.
Camera shake occurs when the camera moves during exposure. Even slight hand movement can cause blur, especially when:
- Using slow shutter speeds
- Shooting in low-light environments
- Zooming with telephoto lenses
- Taking photos one-handed
- Feeling tired, stressed, or physically shaky
The longer the camera’s shutter stays open, the more likely movement will appear in the final image.
Camera Shake vs. Motion Blur
These two issues are often confused.
Camera Shake
- Caused by camera movement
- Entire image appears soft or blurry
Motion Blur
- Caused by a moving subject
- Background may remain sharp while the subject blurs
Identifying the source helps you apply the right solution.
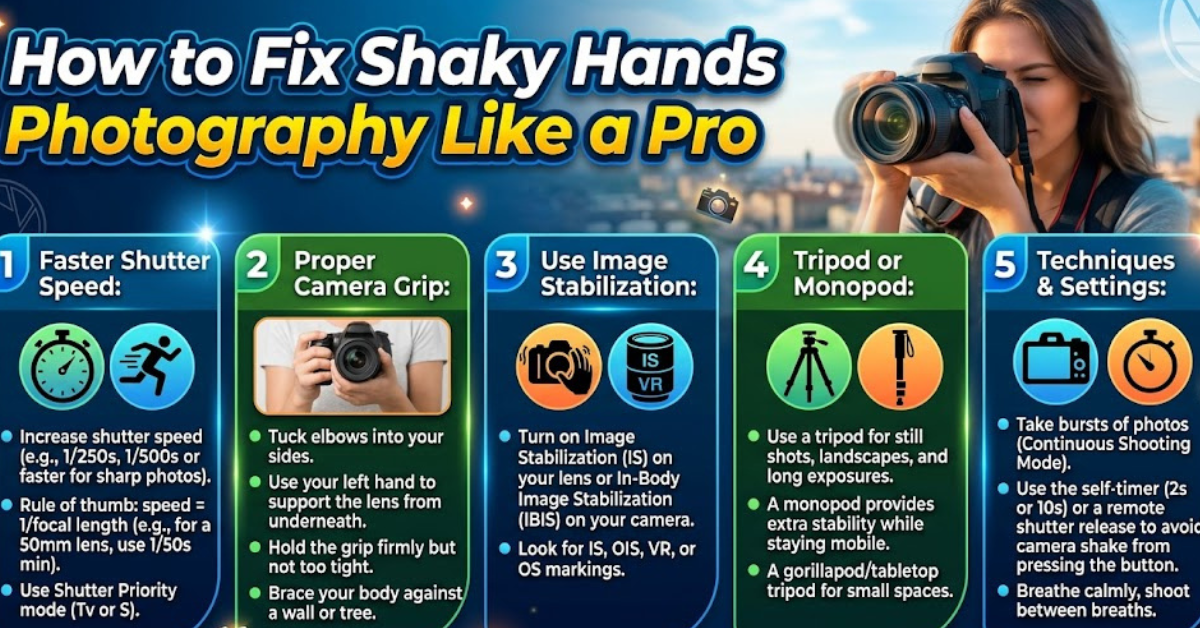
Use a Faster Shutter Speed
One of the most effective answers to how to fix shaky hands photography is increasing your shutter speed.
A faster shutter speed freezes movement and minimizes the effects of hand shake.
Recommended Shutter Speeds
A common photography rule is:
Minimum shutter speed = 1 ÷ focal length
Examples:
- 50mm lens → at least 1/50 second
- 100mm lens → at least 1/100 second
- 200mm lens → at least 1/200 second
For extra sharpness, many photographers double these values.
For instance:
- 200mm lens → use 1/400 second or faster
This becomes especially important when photographing wildlife, sports, or distant subjects.
Improve Your Hand-Holding Technique
Many photographers overlook proper camera handling.
Small adjustments in posture can significantly reduce blur.
How to Hold a Camera Steadily
Follow these steps:
- Keep your elbows tucked close to your body.
- Use both hands to support the camera.
- Stand with feet shoulder-width apart.
- Press the shutter gently instead of jabbing it.
- Lean against a wall or stable object when available.
Think of your body as a human tripod.
Control Your Breathing
Professional shooters often use breathing techniques similar to marksmen.
Try this method:
- Take a breath
- Exhale slowly
- Press the shutter during the pause before your next inhale
This minimizes body movement at the moment of capture.
Enable Image Stabilization
Modern cameras and lenses often include stabilization technology.
Depending on the manufacturer, it may be called:
- IS (Canon)
- VR (Nikon)
- OSS (Sony)
- OIS (Optical Image Stabilization)
- IBIS (In-Body Image Stabilization)
These systems compensate for small movements and can provide several stops of stabilization.
When Stabilization Helps Most
Image stabilization is particularly useful for:
- Handheld photography
- Low-light shooting
- Travel photography
- Telephoto lenses
- Street photography
However, if you’re using a sturdy tripod, stabilization may sometimes be unnecessary or even counterproductive depending on the equipment.
Increase ISO When Necessary
Low light often forces slower shutter speeds.
Raising ISO allows the camera to use faster shutter speeds, reducing blur caused by shaky hands.
Finding the Right Balance
While higher ISO can introduce noise, a slightly noisy image is often better than a blurry one.
For example:
| Situation | Suggested ISO |
| Bright daylight | 100–200 |
| Cloudy conditions | 400–800 |
| Indoor photography | 800–3200 |
| Very low light | 3200+ |
Modern cameras from Sony, Canon, Nikon, Fujifilm, and Panasonic handle higher ISO values better than ever.
Use a Wider Aperture
A wider aperture allows more light to reach the sensor.
This enables faster shutter speeds without raising ISO excessively.
Examples:
- f/1.4
- f/1.8
- f/2.8
These settings are especially useful for:
- Portrait photography
- Indoor events
- Night photography
- Street photography
Keep in mind that wider apertures create a shallower depth of field, so accurate focus becomes more important.
Use Burst Mode for Sharper Results
A surprisingly effective trick is shooting multiple images in quick succession.
Why It Works
When pressing the shutter, your finger movement can introduce slight shake.
In burst mode:
- The first frame may be blurry
- Subsequent frames are often sharper
Many photographers use this technique when shooting handheld in challenging conditions.
Even a short burst of three to five frames can increase the chances of capturing a perfectly sharp image.
Consider a Tripod or Monopod
If hand shake is a recurring problem, support equipment can make a huge difference.
Benefits of a Tripod
A tripod:
- Eliminates most camera movement
- Enables long exposures
- Improves landscape photography
- Helps with night photography
Benefits of a Monopod
A monopod offers:
- Better mobility
- Faster setup
- Added stability for telephoto lenses
- Useful support for sports and wildlife photography
For many photographers, a monopod provides an ideal balance between stability and convenience.
Use Remote Shutter Options
Pressing the shutter button can create subtle vibrations.
Remote triggering removes that source of movement.
Options include:
- Wireless remotes
- Smartphone camera apps
- Bluetooth triggers
- Camera self-timer
For landscape, macro, and long-exposure photography, this simple adjustment can noticeably improve image sharpness.
Adjust Your Camera’s Shooting Position
Body positioning affects stability more than many photographers realize.
Stable Shooting Positions
Try these techniques:
Standing Position
- Feet apart
- Elbows tucked in
- Camera close to face
Kneeling Position
- One knee on the ground
- Arm braced against knee
Seated Position
- Elbows resting on legs
These positions create additional points of contact and reduce unwanted movement.
Use Lighter Camera Equipment
Heavy camera setups can increase fatigue, which often leads to shakier hands.
Consider:
- Lightweight mirrorless cameras
- Compact prime lenses
- Carbon-fiber tripods
- Ergonomic camera grips
Reducing weight can improve comfort during long shooting sessions and help maintain steadier control.
Reduce Physical Causes of Hand Tremors
Sometimes the issue isn’t photography technique but physical factors affecting stability.
Temporary hand shakiness may result from:
- Excess caffeine
- Fatigue
- Stress
- Dehydration
- Low blood sugar
Before an important photography session:
- Stay hydrated
- Get adequate rest
- Eat balanced meals
- Limit excessive caffeine intake
If persistent tremors interfere with daily activities, consulting a healthcare professional may be appropriate.
Best Camera Settings for Shaky Hands
If you’re wondering how to fix shaky hands photography quickly, start with this setup:
General Handheld Photography Settings
- Shooting Mode: Aperture Priority or Shutter Priority
- Shutter Speed: 1/250 second or faster
- ISO: Auto ISO enabled
- Image Stabilization: On
- Burst Mode: Enabled
- Focus Mode: Continuous autofocus when subjects move
These settings provide a solid starting point for sharper handheld images
Common Mistakes That Cause Blurry Photos
Avoid these frequent errors:
- Using shutter speeds that are too slow
- Holding the camera with one hand
- Zooming excessively without stabilization
- Ignoring image stabilization features
- Shooting while fatigued
- Pressing the shutter too aggressively
- Using heavy equipment without support
Correcting even one of these mistakes can noticeably improve image quality.
Key Takeaways
- Use faster shutter speeds whenever possible.
- Turn on image stabilization features.
- Improve your camera-holding technique.
- Increase ISO in low-light situations.
- Use wider apertures to gather more light.
- Shoot in burst mode for better odds of sharp images.
- Consider tripods, monopods, or remote triggers.
- Minimize physical factors that contribute to hand shake.
Frequently Asked Questions
How do I stop my hands from shaking while taking pictures?
Use proper posture, hold the camera with both hands, tuck your elbows in, and increase your shutter speed. Image stabilization can also help reduce blur caused by minor hand movements.
What shutter speed is best for shaky hands photography?
A good starting point is using a shutter speed equal to or faster than your lens focal length. Many photographers prefer doubling that speed for extra sharpness.
Can image stabilization fix shaky hands photography completely?
Image stabilization significantly reduces camera shake but cannot eliminate all movement. Combining stabilization with good technique produces the best results.
Why are my photos blurry even with autofocus?
Blur may be caused by camera shake rather than focus issues. Check your shutter speed and ensure you’re holding the camera steadily during exposure.
Is a tripod necessary for shaky hands?
Not always. Faster shutter speeds, stabilization systems, and proper technique often solve the problem. However, a tripod provides the highest level of stability for difficult shooting conditions.
Do professional photographers have perfectly steady hands?
No. Professional photographers rely on technique, camera settings, stabilization technology, and support equipment rather than naturally steady hands alone.
Conclusion
Learning how to fix shaky hands photography is less about eliminating every movement and more about using smart techniques to control it. Faster shutter speeds, proper camera handling, image stabilization, and supportive gear can transform blurry images into sharp, professional-looking photographs.
The next time you head out with your camera, apply these strategies one by one. Even small adjustments can make a noticeable difference, helping you capture clearer, sharper photos with confidence.