









Crocheting is full of small techniques that make a big difference, and decreasing is one of them. Whether you’re shaping a cozy hat, creating stuffed animals, or making fitted garments, knowing how to decrease in crochet helps your projects look polished and professional.
If you’ve ever wondered why your crochet pattern suddenly tells you to “decrease” or uses abbreviations like sc2tog or dc2tog, you’re in the right place. This guide explains everything in plain language—from what decreasing means to when and how to do it correctly. By the end, you’ll feel confident using crochet decreases in almost any project.
What Does Decreasing Mean in Crochet?
A crochet decrease is a technique used to combine two or more stitches into one. This reduces the total stitch count and gradually shapes your work.
Instead of working one complete stitch into each stitch from the previous row, you’ll partially complete stitches before joining them into a single stitch.
Decreasing is commonly used for:
- Hats
- Beanies
- Sleeves
- Sweaters
- Socks
- Crochet toys (amigurumi)
- Gloves
- Bags
- Decorative home projects
Without decreases, most crochet projects would remain flat and rectangular.
Why Learning Crochet Decreases Matters
Understanding decreases gives you much greater control over your crochet projects.
Benefits include:
- Creates rounded shapes
- Helps garments fit properly
- Forms curves and angles
- Reduces bulky fabric
- Produces cleaner finishing
- Makes professional-looking amigurumi
It’s one of the first shaping techniques every crocheter should master.
Types of Crochet Decreases
Different stitches require different decrease methods.
The most common include:
Single Crochet Decrease (sc2tog)
This is the easiest and most frequently used decrease.
It joins two single crochet stitches into one.
Half Double Crochet Decrease (hdc2tog)
Used in projects worked with half double crochet stitches.
Creates smooth shaping while maintaining stitch height.
Double Crochet Decrease (dc2tog)
Ideal for blankets, garments, scarves, and shawls.
Produces a taller decrease that blends naturally into double crochet rows.
Invisible Decrease
Especially popular in amigurumi.
It creates nearly invisible shaping and prevents noticeable gaps.
How to Decrease in Crochet Step by Step
Let’s start with the most common method.
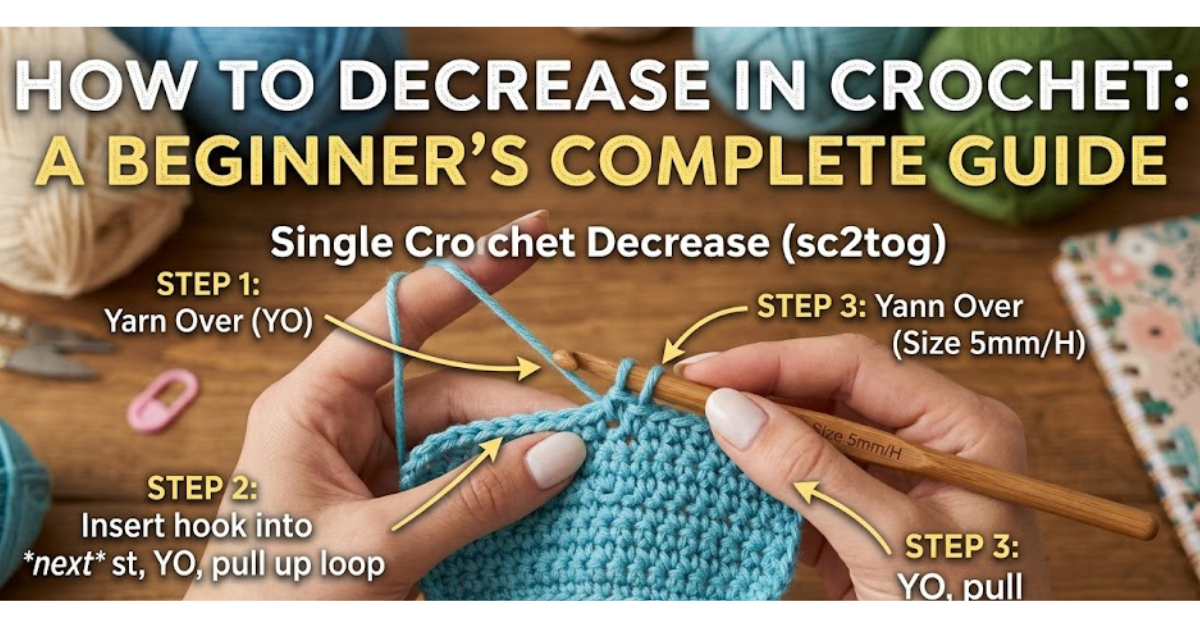
How to Make a Single Crochet Decrease (sc2tog)
Follow these simple steps:
- Insert your hook into the first stitch.
- Yarn over.
- Pull up a loop.
- Insert your hook into the next stitch.
- Yarn over again.
- Pull up another loop.
- You now have three loops on your hook.
- Yarn over once more.
- Pull through all three loops.
You’ve successfully turned two stitches into one.
This technique is abbreviated in patterns as:
- sc2tog
- sc dec
- single crochet decrease
How to Double Crochet Decrease (dc2tog)
For double crochet:
- Yarn over.
- Insert hook into the first stitch.
- Yarn over and pull up a loop.
- Yarn over and pull through two loops.
- Leave the remaining loops on the hook.
- Yarn over again.
- Insert hook into the next stitch.
- Pull up a loop.
- Yarn over and pull through two loops.
- Yarn over and pull through every remaining loop.
This joins two double crochet stitches into one.
How to Make an Invisible Decrease
If you enjoy making crochet animals, you’ll probably use this technique often.
Instead of inserting the hook under both loops of each stitch:
- Insert the hook into the front loop of the first stitch.
- Insert it into the front loop of the second stitch.
- Yarn over.
- Pull through both front loops.
- Complete a regular single crochet.
The result is much smoother with smaller holes.
When Should You Decrease in Crochet?
Patterns use decreases whenever shaping is required.
Typical situations include:
Hats
Decrease near the crown to close the top neatly.
Amigurumi
Shape:
- Heads
- Arms
- Legs
- Bodies
- Ears
- Tails
Sweaters
Decrease around:
- Sleeves
- Necklines
- Armholes
- Waist shaping
Mittens and Gloves
Reduce stitches around fingertips for a comfortable fit.
Understanding Crochet Pattern Abbreviations
Many beginners struggle because patterns use abbreviations.
Common decrease abbreviations include:
| Abbreviation | Meaning |
| sc2tog | Single crochet two together |
| hdc2tog | Half double crochet two together |
| dc2tog | Double crochet two together |
| dec | Decrease |
| inv dec | Invisible decrease |
Always check the pattern’s abbreviation guide since designers occasionally use slightly different notation.
Common Mistakes When Decreasing
Even experienced crocheters occasionally make these errors.
Skipping a Stitch
Always count carefully.
Missing stitches can change the entire shape of your project.
Pulling Too Tight
Over-tightening makes decreases difficult to work into later.
Aim for consistent tension.
Forgetting the Stitch Count
Most patterns rely on precise stitch counts.
Count every row after completing decreases.
Using the Wrong Decrease
Invisible decreases work best for amigurumi.
Standard decreases are often better for garments and blankets.
Tips for Cleaner Crochet Decreases
Small adjustments can dramatically improve your finished project.
Maintain Even Tension
Try to keep every stitch the same size.
Use Stitch Markers
Markers help identify:
- Beginning of rounds
- Decrease locations
- Pattern repeats
Practice on Scrap Yarn
Before starting an important project, practice several decrease methods.
You’ll quickly develop muscle memory.
Read the Pattern First
Many crochet mistakes happen simply because instructions weren’t read completely before starting
Increase vs. Decrease in Crochet
These techniques work opposite one another.
| Increase | Decrease |
| Adds stitches | Removes stitches |
| Makes fabric wider | Makes fabric narrower |
| Creates expansion | Creates shaping |
| Often uses two stitches in one | Combines two stitches into one |
Most shaped crochet projects use both increases and decreases together.
Best Projects to Practice Crochet Decreases
If you’re learning, try projects that naturally include shaping.
Great beginner options include:
- Simple beanies
- Crochet pumpkins
- Small stuffed animals
- Dish scrubbers
- Baby hats
- Mini baskets
- Christmas ornaments
These projects let you practice without becoming overwhelming.
How to Fix a Crochet Decrease Mistake
Don’t panic if something looks wrong.
You can usually fix it by:
- Carefully unraveling (frogging) to the mistake
- Counting stitches again
- Reworking the decrease
- Checking pattern instructions
- Comparing your row with the previous one
Fixing a small error early saves much more work later.
Key Takeaways
- A decrease combines two stitches into one.
- Different stitch types have different decrease methods.
- Invisible decreases create cleaner results for amigurumi.
- Even tension produces smoother shaping.
- Counting stitches prevents mistakes.
- Practice makes decreases feel natural over time.
Frequently Asked Questions
How do you decrease in crochet for beginners?
The easiest method is the single crochet decrease (sc2tog), where two stitches are worked together into one. It reduces the stitch count while creating smooth shaping.
What is the easiest crochet decrease?
The single crochet two together (sc2tog) is generally considered the simplest decrease. It’s commonly used in beginner-friendly patterns for hats, toys, and accessories.
What is an invisible crochet decrease?
An invisible decrease is a technique that works through only the front loops of two stitches before completing a single crochet. It creates a neater finish with fewer visible gaps, making it ideal for amigurumi.
Why are my crochet decreases leaving holes?
Large holes are usually caused by loose tension or using a standard decrease where an invisible decrease would work better. Keeping your stitches even can significantly improve the appearance.
Do all crochet patterns use decreases?
No. Flat items like scarves and simple blankets often don’t require shaping. However, hats, garments, toys, and many wearable projects frequently include decreases.
Can I substitute one decrease method for another?
Sometimes, but it depends on the project. Invisible decreases are excellent for stuffed toys, while standard decreases often blend better into garments and textured designs
Conclusion
Learning how to decrease in crochet is one of the most valuable skills for anyone who wants to move beyond basic rectangles and create beautifully shaped projects. Whether you’re crocheting hats, sweaters, amigurumi, or home décor, mastering decreases gives your work a cleaner, more professional finish.
The key is to practice slowly, keep your stitch tension consistent, and count your stitches regularly. With just a little repetition, crochet decreases will become second nature. Once you’re comfortable with this technique, you’ll be ready to tackle more advanced patterns and create projects with confidence.