






Have you ever folded a sheet of paper into an airplane, only to watch it dive straight into the floor? You’re not alone. A few small folding mistakes can make a huge difference in how well a paper airplane flies.
If you’re wondering how to make a paper airplane that actually glides smoothly and travels a long distance, you’ve come to the right place. This guide walks you through beginner-friendly folding instructions, explains the science behind flight, and shares practical tips that help your paper airplane fly farther, straighter, and longer. Whether you’re teaching kids, looking for a fun indoor activity, or simply feeling nostalgic, you’ll find everything you need here.
Why Paper Airplanes Are Still Popular
Paper airplanes have entertained people for generations because they’re inexpensive, creative, and surprisingly educational.
They help develop:
- Fine motor skills
- Creativity
- Problem-solving abilities
- Basic engineering concepts
- Understanding of aerodynamics
Teachers often use paper airplanes in classrooms to explain lift, drag, thrust, and gravity in a hands-on way.
Materials You’ll Need
The beauty of making paper airplanes is that you need very little.
Essential Materials
- One sheet of A4 or Letter-size paper
- A flat surface for folding
- A ruler (optional for precise folds)
Best Paper for Paper Airplanes
Different paper types produce different flight results.
| Paper Type | Best For |
| Standard printer paper (80 GSM) | Everyday flying |
| Lightweight copy paper | Longer glides |
| Construction paper | Short-distance practice |
| Cardstock | Fast, heavy airplanes |
For beginners, regular printer paper offers the best balance between weight and flexibility.
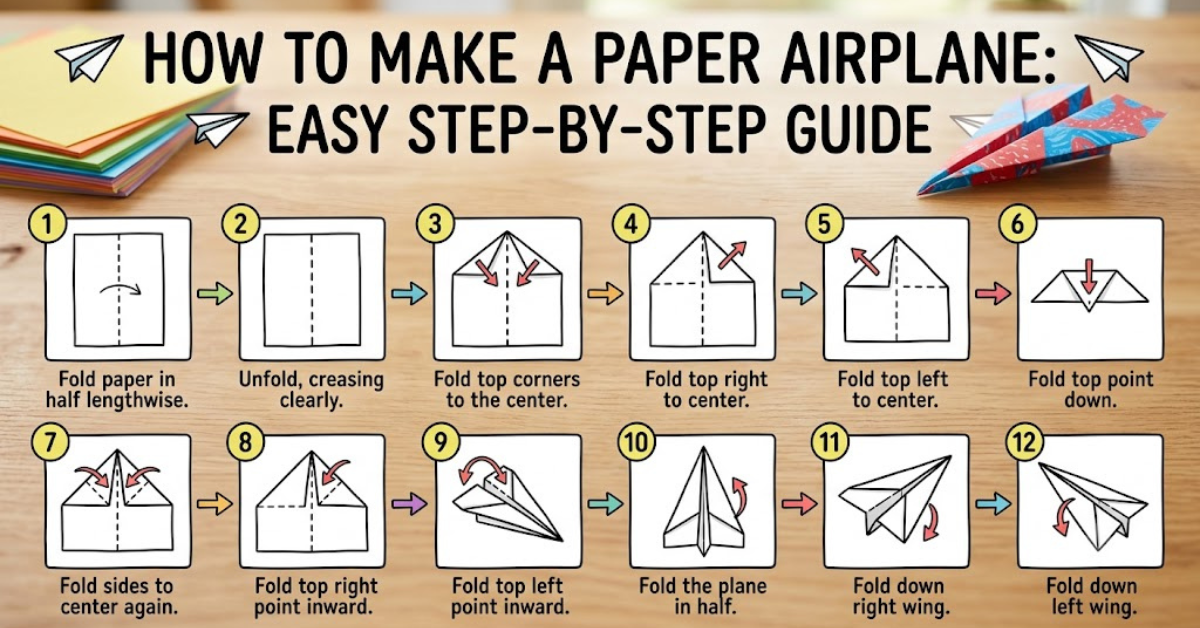
How to Make a Paper Airplane Step by Step
This classic dart airplane is one of the easiest designs to learn.
Step 1: Fold the Paper in Half
Place the paper vertically.
Fold it lengthwise down the center.
Crease firmly and unfold.
The center line will serve as your guide.
Step 2: Fold the Top Corners Inward
Take both top corners.
Fold them toward the center crease.
The edges should meet neatly in the middle.
You should now have a pointed top.
Step 3: Fold the New Angled Edges Again
Repeat the process.
Fold each slanted edge inward until it meets the center line.
This creates a sharper nose.
Step 4: Fold the Plane in Half
Fold the entire airplane along the original center crease.
The pointed nose should be on the outside.
Step 5: Create the Wings
Fold one side downward.
Leave about 1–2 cm of body beneath the wing.
Repeat on the opposite side.
Both wings should match closely.
Step 6: Adjust the Wings
Open the wings carefully.
Flatten them until they’re nearly horizontal.
Small upward bends at the back (called elevators) help stabilize the airplane.
Congratulations—you’ve learned how to make a paper airplane using one of the world’s most reliable designs.
Understanding the Science Behind Flight
A paper airplane may look simple, but it follows the same aerodynamic principles as a real aircraft.
Lift
Air moving over the wings creates upward force.
Wider wings generally produce more lift.
Gravity
Gravity constantly pulls the airplane downward.
A balanced design prevents nose-dives.
Thrust
Your throw provides the forward force.
A smooth, steady throw usually performs better than a hard one.
Drag
Air resistance slows the airplane.
Cleaner folds reduce drag and improve flight.
Tips to Make Your Paper Airplane Fly Farther
A few adjustments can dramatically improve performance.
Fold Carefully
Sharp, symmetrical folds create better balance.
Even tiny differences between the wings affect flight.
Keep the Nose Tight
A pointed, firm nose cuts through the air more efficiently.
Loose folds often lead to unstable flights.
Throw Smoothly
Instead of throwing as hard as possible:
- Aim slightly upward
- Use a gentle motion
- Release smoothly
This creates better lift.
Check Wing Alignment
Both wings should be identical.
Uneven wings cause turning or spiraling.
Add Small Wing Flaps
Bending the back edge of each wing upward just a few millimeters improves stability.
Common Mistakes Beginners Make
Many paper airplanes fail because of avoidable errors.
Uneven Wings
One wing larger than the other creates imbalance.
Always compare both sides before flying.
Weak Creases
Loose folds shift during flight.
Press each crease firmly.
Heavy Paper
Thicker paper falls faster.
Standard printer paper usually works best.
Throwing Too Hard
More force doesn’t always mean longer flights.
Controlled throws often travel farther.
Different Types of Paper Airplanes
Once you’ve mastered the classic design, try experimenting.
Glider
Features:
- Wide wings
- Slow flight
- Long hang time
Best for indoor flying.
Dart Plane
Features:
- Narrow wings
- Fast speed
- Long-distance travel
Excellent for competitions.
Stunt Plane
Features:
- Curved wings
- Loops
- Spins
- Tricks
Ideal for experimenting.
Long-Distance Plane
Designed with:
- Narrow body
- Balanced weight
- High stability
Perfect if distance is your goal.
How to Improve Flight Distance
If you’re trying to break your personal record, focus on small adjustments.
Experiment With:
- Wing angle
- Nose weight
- Paper thickness
- Throw angle
- Wing flaps
Keep changing only one variable at a time.
This helps identify what improves performance.
Fun Activities with Paper Airplanes
Paper airplanes aren’t just toys.
They’re excellent for learning and friendly competition.
Ideas Include
- Distance contests
- Accuracy challenges
- Obstacle courses
- Classroom STEM projects
- Family competitions
- Paper airplane decorating contests
These activities combine creativity with science.
How Kids Benefit from Making Paper Airplanes
Folding paper airplanes helps children develop valuable skills.
Benefits include:
- Hand-eye coordination
- Patience
- Logical thinking
- Creativity
- Following instructions
- Basic physics understanding
Parents and teachers often use this activity as an engaging educational exercise.
Paper Airplane Safety Tips
Although paper airplanes are harmless, a few precautions help everyone stay safe.
- Avoid throwing toward faces.
- Use open spaces.
- Don’t throw near ceiling fans.
- Keep sharp paper edges away from small children.
- Pick up airplanes after use to prevent slipping.
Expert Tips for Better Results
Experienced paper airplane enthusiasts recommend:
- Use fresh paper instead of crumpled sheets.
- Make crisp folds with your fingernail or a ruler.
- Test indoors before flying outside.
- Adjust wing tips gradually.
- Practice several throws before making changes.
Even professional paper airplane designers spend time fine-tuning their models.
Key Takeaways
- Learning how to make a paper airplane is simple with careful folding.
- Standard printer paper provides excellent results.
- Symmetrical wings improve balance and stability.
- Gentle throws often outperform powerful ones.
- Small adjustments can dramatically increase flight distance.
- Understanding lift, drag, gravity, and thrust helps improve every design.
Frequently Asked Questions
What is the easiest way to make a paper airplane?
The classic dart design is the simplest option. It uses only a few folds and is perfect for beginners learning how to make a paper airplane.
Which paper is best for making paper airplanes?
Standard printer paper is the most popular choice because it offers a good balance between flexibility and durability. Lightweight copy paper also performs well for long glides.
Why does my paper airplane keep nosediving?
A nosedive usually happens because the airplane is front-heavy, the wings are uneven, or the throw is too forceful. Adjust the wing angle slightly upward and check that both sides match.
How can I make my paper airplane fly farther?
Use sharp folds, symmetrical wings, lightweight paper, and a smooth throw. Minor wing adjustments can significantly improve flight distance.
What is the best paper airplane design for beginners?
The traditional dart airplane is widely considered the easiest and most reliable model. It is quick to fold and flies consistently with proper technique.
Can paper airplanes teach science?
Yes. Paper airplanes demonstrate important aerodynamic concepts such as lift, drag, thrust, and gravity. They’re frequently used in STEM classrooms to make physics more engaging.
Conclusion
Learning how to make a paper airplane is more than just folding paper—it’s an enjoyable way to explore creativity, improve problem-solving skills, and understand the basics of flight. With the right paper, precise folds, and a little practice, you can build airplanes that glide smoothly, travel impressive distances, or perform fun aerial tricks.
The best part is that every flight teaches you something new. Experiment with different designs, fine-tune your technique, and challenge yourself to create an even better paper airplane with each fold.